
Dreamsavior - Meet the Image Translator: Translate the Words Inside Your Game Art part 3
infoAbout This Title
A title screen, menu button, HUD element, or illustrated sign often carries just as much meaning as a dialogue box. Traditionally, localizing these graphics meant juggling external photo editors, manual text extraction, and painstaking manual repainting.
Image Translator bridges that gap inside Translator++. It merges OCR, automated translation, AI-driven background cleanup, and visual typesetting into one unified workspace: detect text with OCR, translate directly inside the grid or canvas, and watch the translated graphics update in real time.
1. Import and Open Images
Engine-Integrated Scanning
When creating a new project from a supported game engine (such as RPG Maker XP, VX, VX Ace, MV, and MZ, Ren’Py, TyranoBuilder, or Wolf RPG Editor), toggle on Include images for OCR translation.
Smart Filtering: Translator++ automatically scans common text-bearing asset directories (such as Pictures, System, and titles). Images without detectable text are automatically skipped, keeping your project lean and relevant.
Encrypted Archives: For RPG Maker MV/MZ, encrypted .rpgmvp / .png_ files are seamlessly decrypted for editing and automatically re-encrypted during project export/injection.
Standalone Image Projects
You can also:
Start a dedicated image translation project via New Project → Image File Translator.
Add images to any active project via Tools → Image Translator → Import Images (files/folder).
Accessing the Canvas View
Switch to the Images tab above the object tree on the left.
Select an image file.
Click the Picture icon in the top toolbar to switch from the spreadsheet grid to the interactive visual editor.
2. Erase Original Text with One Click (LaMa Inpainting)
When source text is flattened into the artwork, you don’t need to manually clone stamp or redraw backgrounds.
Click the Eraser icon in the canvas toolbar (Remove all original text from this image).
Translator++ uses the detected OCR bounding boxes as an inpainting mask and passes the image to local LaMa inpainting (powered by local ComfyUI).
The original text is wiped clean while textures, gradients, and backgrounds are filled in seamlessly.
Non-Destructive by Design: The cleaned background is written to a dedicated Cleanup layer. Your original image is never overwritten.
3. Translate and Typeset on the Canvas
Every OCR-detected block behaves like standard Translator++ row data:
Direct Editing: Click any text box on the canvas to edit its translation in the bottom pane (Default translation / Context translation), or double-click to type directly.
Grid Synchronization: Switch back to grid view at any time to edit rows in bulk, apply glossaries, or run search-and-replace queries.
Interactive Transforms: Drag text boxes to reposition them or grab the edge handles to resize them. If OCR missed a label, draw a new rectangle or polygon box using the toolbar tools.
Fine-Tuning Appearance (Text Block Style)
With a text box selected, use the Text block style inspector panel on the right to match the game’s UI aesthetic:
Typography: Select fonts, toggle auto font sizing, and set horizontal/vertical alignments.
Colors & Opacity: Customize font color and opacity independently.
Background Box: Add an optional colored background box behind the text with custom padding, opacity, and rounded corner radius.
Outlines: Add crisp outlines/stroke with adjustable width, color, and opacity for readability over busy backgrounds.
Tip: Press Ctrl + A on the canvas to select all text blocks at once and adjust styling properties across the entire image in a single click.
4. Inspect with the Multi-Layer System
The Layers panel keeps all components separate and reversible:
Texts: The overlay containing translated typography and bounding boxes.
AI Inpaint: Contains custom generative AI modifications.
Krita: Houses any external edits pushed from Krita.
Cleanup: The AI-reconstructed background layer without source text.
Original image: The locked, untouched source asset.
Use the eye icon next to each layer to toggle visibility, or use the quick-comparison header buttons:
[Original]: Displays the untouched source asset.
[Clean]: Shows the infilled artwork without any text overlays.
[Final]: Shows the complete localized graphic ready for in-game export.
5. Scale Up with Batch Operations
Translating dozens of menus or button states one by one is impractical. Because image text is standard project data, you can automate repetitive work across entire folders:
In the Images panel on the left, select multiple images (or right-click to choose Select all).
Right-click the selection to open the batch menu:
Batch translation: Run AI engines (OpenAI, Claude, DeepL, etc.) across all detected image text rows in batch.
Remove original text (inpaint)…: Run background text infilling across all selected images sequentially.
Batch image text style…: Apply standardized typography, colors, bounding boxes, or outlines across multiple files at once. Check only the properties you wish to standardize—unchecked properties remain untouched on individual boxes.
6. Advanced Editing: Generative AI Inpainting & Krita
Prompt-Based Image Inpainting (ComfyUI)
Beyond text translation, you can alter, replace, or add objects to game artwork:
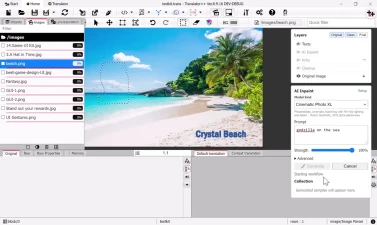
Select the AI inpaint selection tool (dotted polygon lasso).
Click points around the target area to create a selection boundary, closing it at the starting point.
In the AI Inpaint panel, enter a descriptive text prompt (e.g., “treasure chest on the sand” or “godzilla on the sea”).
Select a model profile (such as Cinematic Photo XL), adjust Strength, and click Generate.
Generated variations appear in the Collection tray below. Select your favorite output and click Apply to write it to the AI Inpaint layer.
External Roundtrip with Krita
I wouldn’t dare pretend to build a full‑fledged image‑editing suite. This built‑in editor is intentionally small and focused on translation. If you need advanced image work, you can do it in Krita. Translator++ bridges the workflow so your editing remains seamless.
Krita is a free and open-source digital painting and illustration program. It is widely used for creating digital paintings, concept art, illustrations, comics, and frame-by-frame animations. You can download it for free here.
For detailed digital painting, complex masking, or custom brushwork:
Click the Krita icon in the toolbar, or choose Tools → Image Translator → Edit current image in Krita.
Make your edits in Krita and press Save (Ctrl + S).
The changes stream directly back into Translator++ on a dedicated Krita layer, keeping your vector text overlays and translation state synchronized.
Recommended Workflow Summary
By bringing graphics directly into the translation grid, Translator++ removes the friction of graphic editing and lets you focus on delivering high-quality, fully localized games. Whether you are retouching a single shop menu or automating hundreds of story CGs across an entire visual novel, everything can now be translated, cleaned, and styled in one place.
Please ensure your software is updated to Translator++ ver. 8.9.1 or newer to take advantage of these features.
Happy translating!
Dreamsavior
A title screen, menu button, HUD element, or illustrated sign often carries just as much meaning as a dialogue box. Traditionally, localizing these graphics meant juggling external photo editors, manual text extraction, and painstaking manual repainting.
Image Translator bridges that gap inside Translator++. It merges OCR, automated translation, AI-driven background cleanup, and visual typesetting into one unified workspace: detect text with OCR, translate directly inside the grid or canvas, and watch the translated graphics update in real time.
1. Import and Open Images
Engine-Integrated Scanning
When creating a new project from a supported game engine (such as RPG Maker XP, VX, VX Ace, MV, and MZ, Ren’Py, TyranoBuilder, or Wolf RPG Editor), toggle on Include images for OCR translation.
Smart Filtering: Translator++ automatically scans common text-bearing asset directories (such as Pictures, System, and titles). Images without detectable text are automatically skipped, keeping your project lean and relevant.
Encrypted Archives: For RPG Maker MV/MZ, encrypted .rpgmvp / .png_ files are seamlessly decrypted for editing and automatically re-encrypted during project export/injection.
Standalone Image Projects
You can also:
Start a dedicated image translation project via New Project → Image File Translator.
Add images to any active project via Tools → Image Translator → Import Images (files/folder).
Accessing the Canvas View
Switch to the Images tab above the object tree on the left.
Select an image file.
Click the Picture icon in the top toolbar to switch from the spreadsheet grid to the interactive visual editor.
2. Erase Original Text with One Click (LaMa Inpainting)
When source text is flattened into the artwork, you don’t need to manually clone stamp or redraw backgrounds.
Click the Eraser icon in the canvas toolbar (Remove all original text from this image).
Translator++ uses the detected OCR bounding boxes as an inpainting mask and passes the image to local LaMa inpainting (powered by local ComfyUI).
The original text is wiped clean while textures, gradients, and backgrounds are filled in seamlessly.
Non-Destructive by Design: The cleaned background is written to a dedicated Cleanup layer. Your original image is never overwritten.
3. Translate and Typeset on the Canvas
Every OCR-detected block behaves like standard Translator++ row data:
Direct Editing: Click any text box on the canvas to edit its translation in the bottom pane (Default translation / Context translation), or double-click to type directly.
Grid Synchronization: Switch back to grid view at any time to edit rows in bulk, apply glossaries, or run search-and-replace queries.
Interactive Transforms: Drag text boxes to reposition them or grab the edge handles to resize them. If OCR missed a label, draw a new rectangle or polygon box using the toolbar tools.
Fine-Tuning Appearance (Text Block Style)
With a text box selected, use the Text block style inspector panel on the right to match the game’s UI aesthetic:
Typography: Select fonts, toggle auto font sizing, and set horizontal/vertical alignments.
Colors & Opacity: Customize font color and opacity independently.
Background Box: Add an optional colored background box behind the text with custom padding, opacity, and rounded corner radius.
Outlines: Add crisp outlines/stroke with adjustable width, color, and opacity for readability over busy backgrounds.
Tip: Press Ctrl + A on the canvas to select all text blocks at once and adjust styling properties across the entire image in a single click.
4. Inspect with the Multi-Layer System
The Layers panel keeps all components separate and reversible:
Texts: The overlay containing translated typography and bounding boxes.
AI Inpaint: Contains custom generative AI modifications.
Krita: Houses any external edits pushed from Krita.
Cleanup: The AI-reconstructed background layer without source text.
Original image: The locked, untouched source asset.
Use the eye icon next to each layer to toggle visibility, or use the quick-comparison header buttons:
[Original]: Displays the untouched source asset.
[Clean]: Shows the infilled artwork without any text overlays.
[Final]: Shows the complete localized graphic ready for in-game export.
5. Scale Up with Batch Operations
Translating dozens of menus or button states one by one is impractical. Because image text is standard project data, you can automate repetitive work across entire folders:
In the Images panel on the left, select multiple images (or right-click to choose Select all).
Right-click the selection to open the batch menu:
Batch translation: Run AI engines (OpenAI, Claude, DeepL, etc.) across all detected image text rows in batch.
Remove original text (inpaint)…: Run background text infilling across all selected images sequentially.
Batch image text style…: Apply standardized typography, colors, bounding boxes, or outlines across multiple files at once. Check only the properties you wish to standardize—unchecked properties remain untouched on individual boxes.
6. Advanced Editing: Generative AI Inpainting & Krita
Prompt-Based Image Inpainting (ComfyUI)
Beyond text translation, you can alter, replace, or add objects to game artwork:
Select the AI inpaint selection tool (dotted polygon lasso).
Click points around the target area to create a selection boundary, closing it at the starting point.
In the AI Inpaint panel, enter a descriptive text prompt (e.g., “treasure chest on the sand” or “godzilla on the sea”).
Select a model profile (such as Cinematic Photo XL), adjust Strength, and click Generate.
Generated variations appear in the Collection tray below. Select your favorite output and click Apply to write it to the AI Inpaint layer.
External Roundtrip with Krita
I wouldn’t dare pretend to build a full‑fledged image‑editing suite. This built‑in editor is intentionally small and focused on translation. If you need advanced image work, you can do it in Krita. Translator++ bridges the workflow so your editing remains seamless.
Krita is a free and open-source digital painting and illustration program. It is widely used for creating digital paintings, concept art, illustrations, comics, and frame-by-frame animations. You can download it for free here.
For detailed digital painting, complex masking, or custom brushwork:
Click the Krita icon in the toolbar, or choose Tools → Image Translator → Edit current image in Krita.
Make your edits in Krita and press Save (Ctrl + S).
The changes stream directly back into Translator++ on a dedicated Krita layer, keeping your vector text overlays and translation state synchronized.
Recommended Workflow Summary
By bringing graphics directly into the translation grid, Translator++ removes the friction of graphic editing and lets you focus on delivering high-quality, fully localized games. Whether you are retouching a single shop menu or automating hundreds of story CGs across an entire visual novel, everything can now be translated, cleaned, and styled in one place.
Please ensure your software is updated to Translator++ ver. 8.9.1 or newer to take advantage of these features.
Happy translating!
Dreamsavior
groupArtist
 1k+
Dreamsaviorverified
movie3 videos
photo_library1 albums
visibility10.5K views
View Profile arrow_forward
1k+
Dreamsaviorverified
movie3 videos
photo_library1 albums
visibility10.5K views
View Profile arrow_forward
Comments (0)